A room you can re-hang.
The build is a first draft. Every decision it made for you — which style the rooms are in, how big each piece hangs, what it is called, which room a visitor meets first — is yours to change, before you save and long after you have published.
Two screens do this work: the builder, before a gallery is saved, and the space editor in your dashboard, for a gallery already in your account. They overlap almost entirely. Where they differ, it is said below.
Where the controls are
There are two of them, and which one you are in depends on where the gallery lives, not on what you want to change.
Before you save anything. Customize on the result card opens the artwork editor; the style picker and Gallery settings sit further up the page. No account, nothing uploaded.
Any gallery in your account, draft or live. Open it from your list of galleries and you can take similar decisions over the space as it stands, plus some additional options: add artworks, reorder rooms or change the brand sign over the entrance.
If you host the gallery yourself, neither screen is where you work: you change what you want in the builder and save a fresh copy, or edit the files you already have. The self-hosting guide covers that.
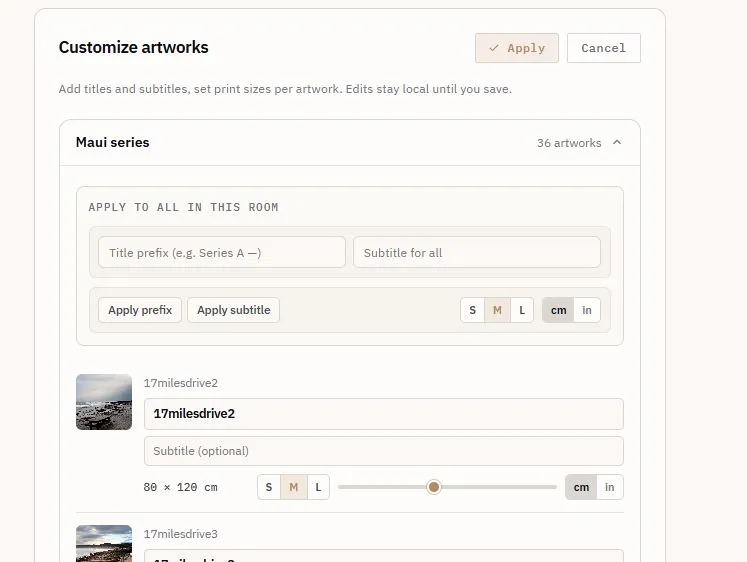
There are two ways to customize characteristics: per item or per the whole room at once. There is a section (highlighted in the figure below) that allows to apply changes to all artworks at once.
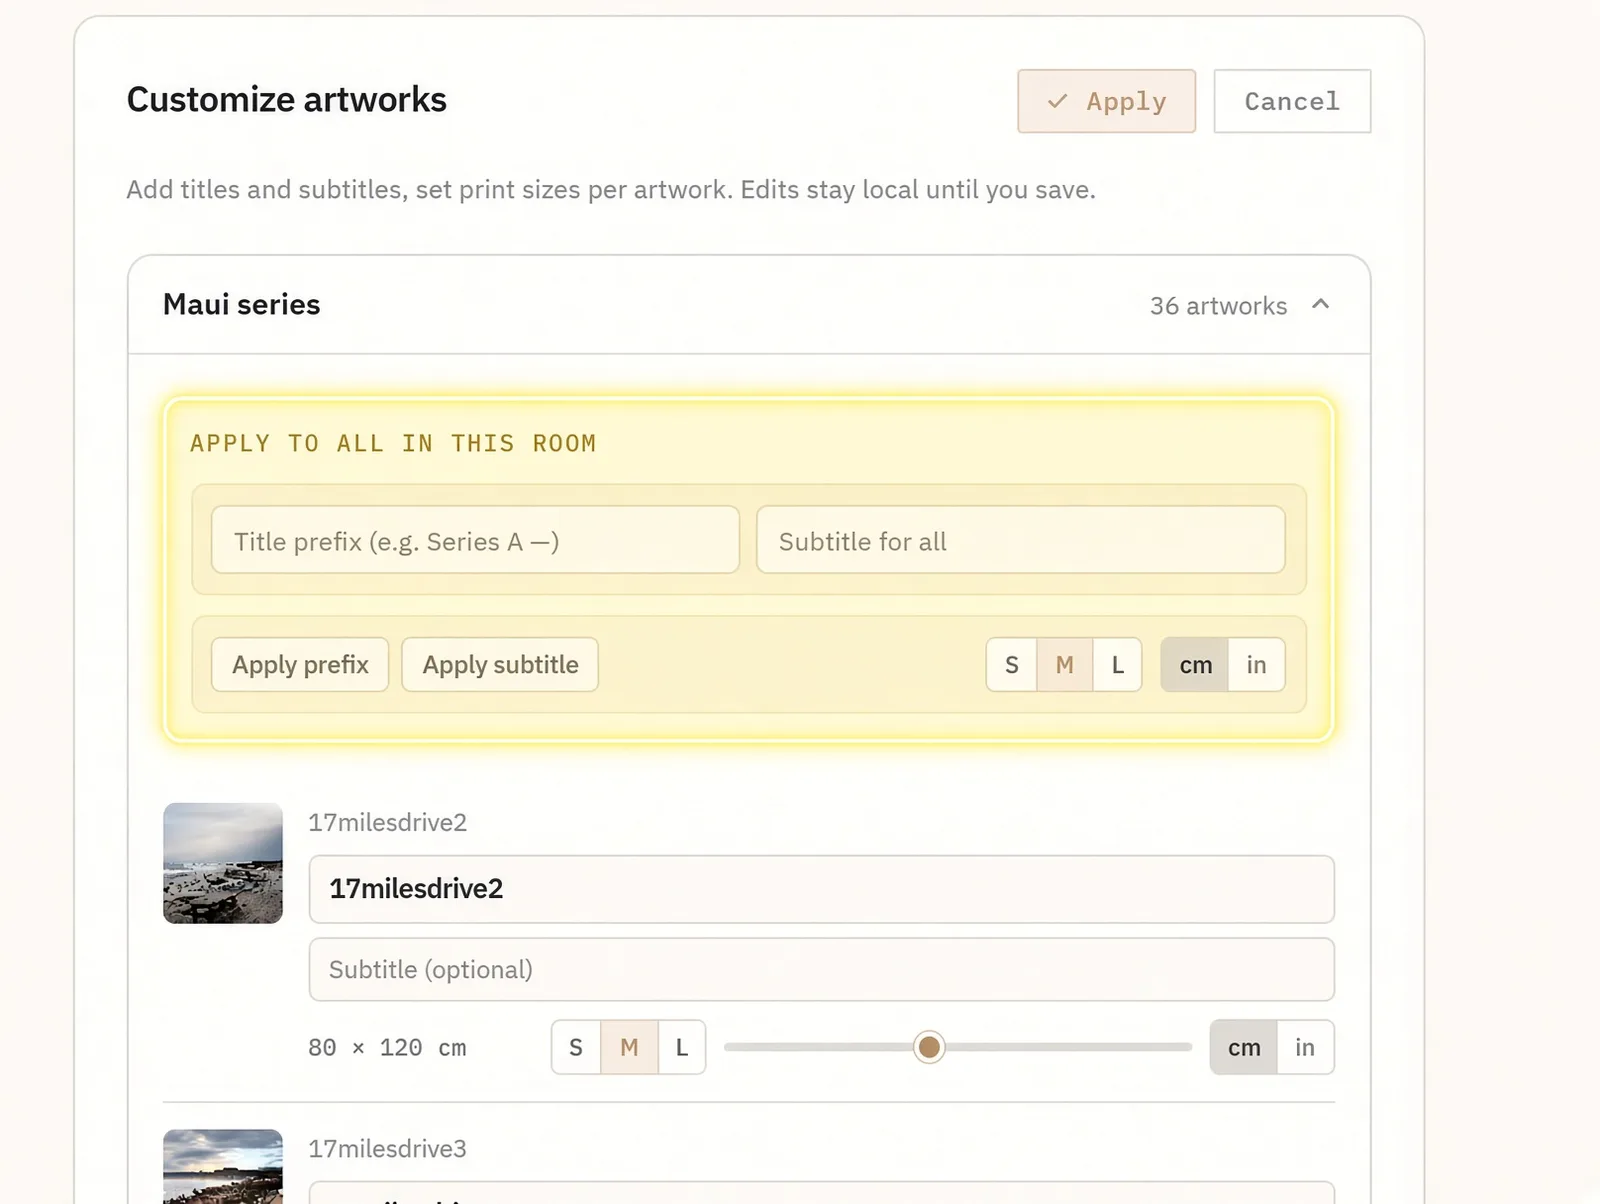
Changing room style
A style is a coordinated set of rooms — walls, floor, illumination, and the lighting baked into them. There are three, and the whole gallery is in one of them.
- Classic
- A mix of modern and classic materials. Ten doorways off the entrance hall.
- Dark
- Dark walls, with frames lit from behind. Ten doorways off the entrance hall.
- Modern
- Pale and plain, the least furnished of the three. Six doorways off the entrance hall.
Changing style in the dashboard re-hangs every room: a different style is a different set of walls, so no room keeps a template from the style it left. Your titles, subtitles and sizes survive it. The exact wall a piece lands on may not.
The number of doorways in the entrance hub is part of the style, and it decides how many rooms hang off it (ten in Classic and Dark, six in Modern). Past that a second hall opens behind one of those doorways and your rooms are divided between the two. In the dashboard you see the split as a separator in the room list.
Changing size
Sizes are real-world measurements. A piece set to 120 cm is 120 cm on the wall, and a visitor standing in front of it reads it at that size.
- S · M · L
- 60, 120 and 180 cm on the longest edge. M is what everything starts at.
- Slider
- Anything from 20 to 250 cm, when none of the three is what you want.
- cm / in
- Switches the readout between centimetres and inches. It changes nothing in the gallery.
- Both edges
- Shown beside the slider. The shorter one follows the aspect ratio of your file.
Every artwork starts at 120 cm on its longest edge, whatever the file is. That is the default behaviour. For photographs is usually fine, as there is no predefined physical size, but paintings have a true physical size. To change the size there are 3 presets (S/M/L) or a slider to choose exactly the size. The size is expressed in the units that you choose (cm or inches)
Each room also has a row (highlighted in the figure above) that applies one size to everything in it, which is the fastest way through a series that should all read the same.
Changing a size re-hangs the room it is in, because the layout is packed against the walls available. A room whose work no longer fits moves into a larger room, or splits into two joined by a door. Nothing is lost in the move; the arrangement changes.
None of this touches your images. Size is how large the piece is mounted, not how many pixels it has — preparing artwork covers what to export.
Changing titles, subtitles and plaques
A title starts as the file name without its extension, and a subtitle starts empty. Both are yours to rewrite, and a subtitle is the line for a year, a medium, a dimension, an edition number or the author.
Per room there are two shortcuts, both worth knowing before you edit forty fields by hand:
- A title prefix goes on the front of every title in the room. Your trailing
space is the separator, so
Series A —reads the way you typed it. - A subtitle for all puts one line under every piece in the room.
Plaques — the museum labels beside each piece — are a single switch for the whole gallery, and they start off. With them off the title is still there: a visitor who steps up to a piece reads it in the overlay at the bottom of the screen. The navigation guide has that panel in full.
Changing the order of the rooms (Only Dashboard)
In the dashboard the rooms are a list, in the order visitors meet them, and the list is the building. Drag a room, or use the arrows, and the doorways rearrange themselves to match.
- Rename a room by clicking its name. The name is what a visitor sees, and it is also what a link to that one room carries — rename it and older links to it stop landing there.
- Remove a room, or a single piece, without touching the rest.
- Add artwork to a room, or drop folders onto the page to add whole rooms. Each folder becomes a room named after the folder, exactly as in the builder.
- Pick the thumbnail — the picture your gallery shows when it is listed or shared — from any piece in any room.
A room with nothing in it is allowed. Visitors can still walk into it.
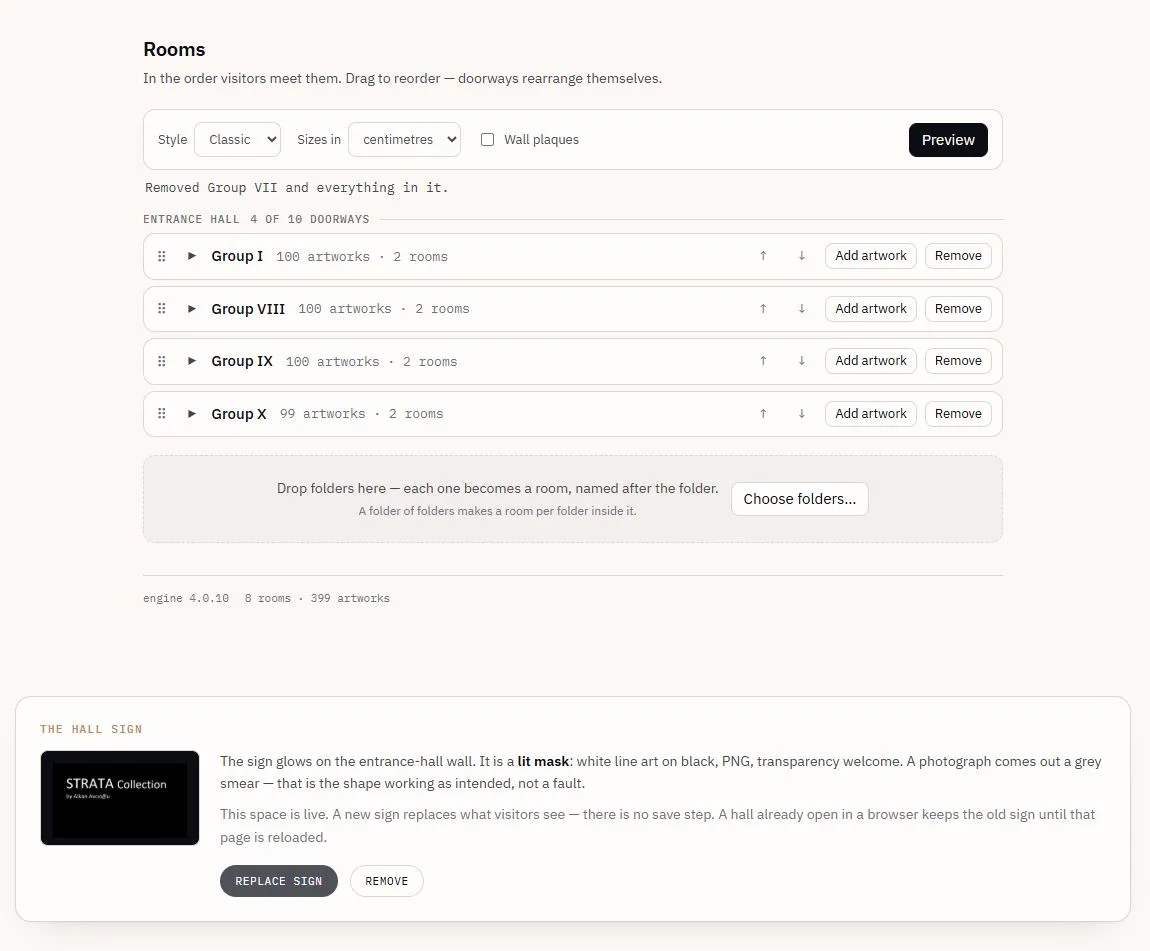
Renaming a room moves no files. Pictures already in it keep loading from the folder they arrived in, and only work added afterwards lands under the new name. None of this is visible to a visitor; it matters only if you go looking in storage.
Changing the logo over the entrance (Only Dashboard)
Every gallery has a lit sign on the entrance-hall wall, showing the brand logo. On any paid plan you can replace it with your own in the editor, so visitors walk into your gallery rather than ours.
It is a lit mask, not a picture: white line art on black, PNG, transparency welcome, up to 5 MB.
On a live gallery the new sign is what visitors see as soon as the edge picks it up; on a draft it is stored now and goes up when you publish. A gallery already open in someone’s browser keeps the old sign until that page is reloaded.
Hosting the gallery yourself, the sign is a file: replace materials/logo.png in
your copy. Same rules, and 1024 × 512 px is the size to aim for.
Change builder settings
Two decisions belong to the builder’s Gallery settings and are fixed once the gallery is built. The space editor keeps them exactly as they are and does not offer them.
- Frames
- On by default. Off mounts each image flush to the wall at its own size.
- Entrance hall
- Skipping it opens the gallery straight into your only room. One folder only, and the lit sign goes with the hall.
To change either one, rebuild in the builder with the setting you want and save over what you have.
Next
Self-hosting covers the other ending: the same gallery as files on a server of your own.
Open your dashboard